
Halloween is hands-down one of the most exciting times to get creative in the kitchen. Forget the same-old candy bowls and neon cupcakes. This year, we’re making spooky, funny, and delicious Ice Cream Cone Cookies that are equal parts creepy and cute. And trust me, these are way easier than they look.
Whether you’re a seasoned baker or a total cookie rookie, this recipe is fun, foolproof, and perfect for everyone—busy parents, college students, home cooks, or anyone who loves edible crafts. We’re combining a buttery sugar cookie base, custom-colored royal icing, and a few airbrush (or marker) tricks to bring these Halloween sugar cookies to life.
And yes, we’re turning skull faces into melting ice cream cones. Because why not?
Let’s get into the madness.
Jump to
- What Are Ice Cream Cone Cookies, Anyway?
- Ingredients & Tools You’ll Need for Your Ice Cream Cone Cookies
- Step-by-Step Instructions for Making Ice Cream Cone Cookies
- Tips for Decorating Ice Cream Cone Cookies Like a Pro
- Fun Variations of Ice Cream Cone Cookies
- Serving & Gifting Ideas
- Related recipes
- Final Thoughts
What Are Ice Cream Cone Cookies, Anyway?
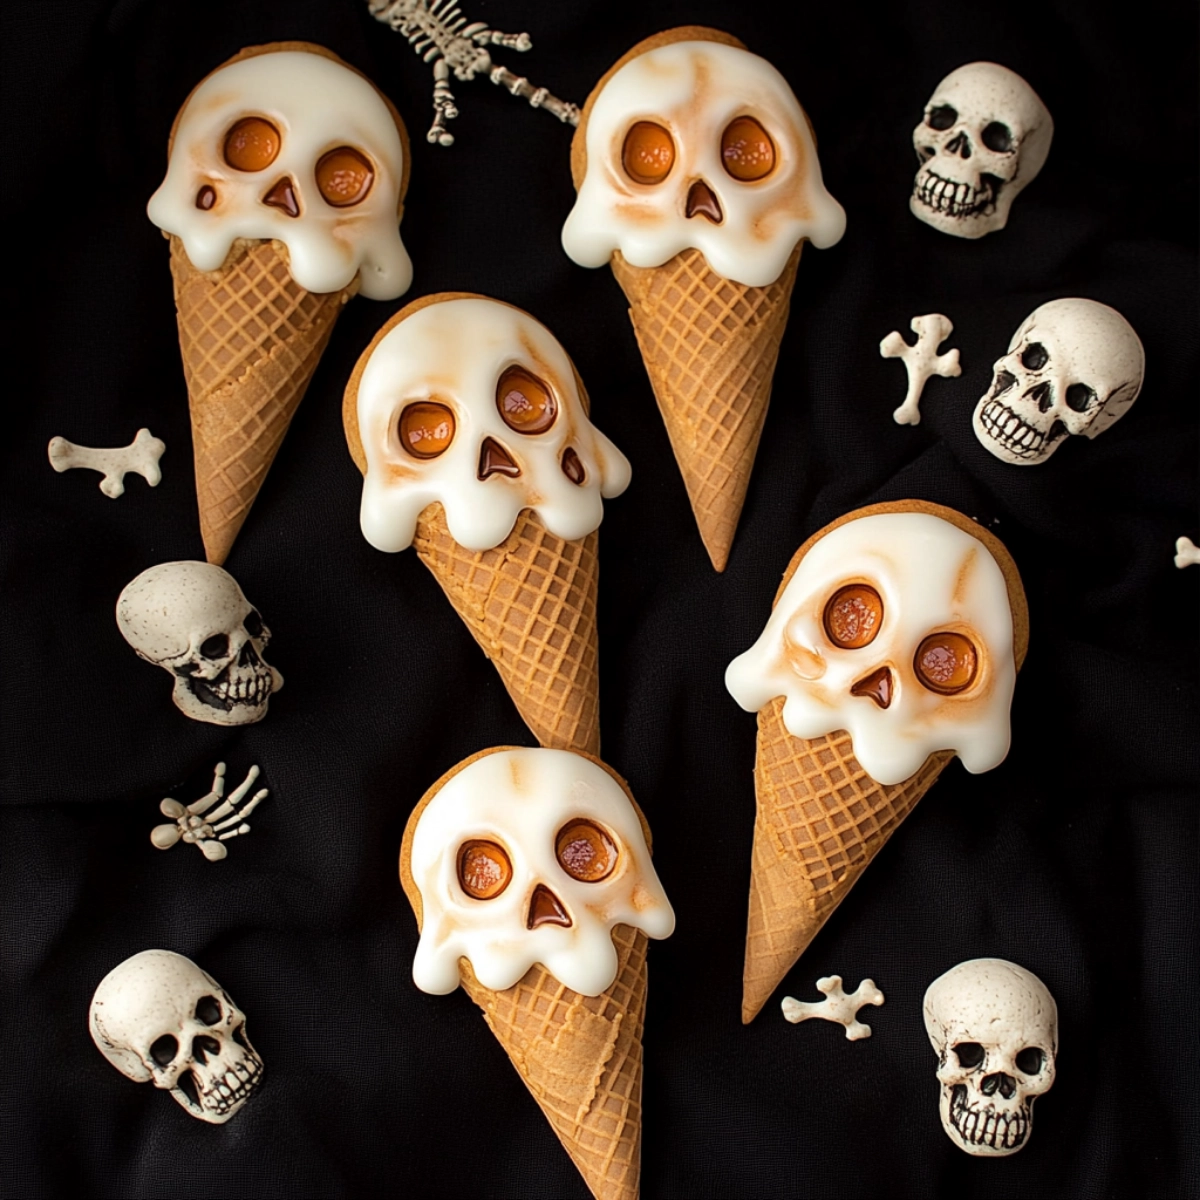
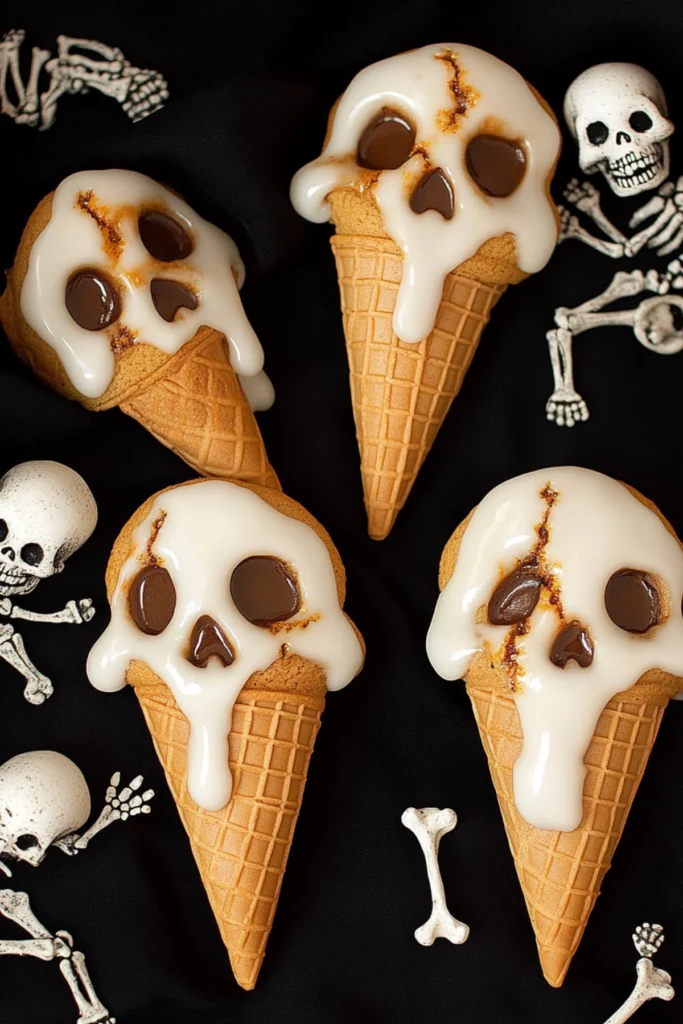
In case you’ve never heard of these before (you’re not alone), Ice Cream Cone Cookies are cookies shaped like ice cream cones but decorated with Halloween-themed faces. Think skulls dripping with white icing, spooky grins, and cone lines airbrushed for a 3D effect.
They’re a fun mashup of two classics: sugar cookies and Halloween treats. You get the crisp snap of a sugar cookie, the sweetness of royal icing, and a design that’ll make your dessert table the star of the spooky season.
Ingredients & Tools You’ll Need for Your Ice Cream Cone Cookies
To keep things simple, we’re using easy-to-find ingredients and basic tools. Here’s what you need to bring your Ice Cream Cone Cookies to life:
For the Cookies:
- Sugar cookie dough (homemade or store-bought)
- Ice cream cone cookie cutter (or a triangle and circle combo if you’re DIY-ing it)
For the Royal Icing:
- White royal icing (for the skull face)
- Tan royal icing (for the cone)
- Food coloring: lemon yellow, ivory, and warm brown (to mix tan)
Decorating Tools:
- Food-safe markers
- Scribe tool or toothpick
- Airbrush machine (optional)
- AmeriMist Warm Brown airbrush color
- Paper and pencil for sketching faces
- Jewel Dust (optional for sparkle)
This is a perfect example of edible Halloween crafts that kids and adults can enjoy making together. It’s also a great way to try your hand at cookie airbrushing without needing to be a pro.
Step-by-Step Instructions for Making Ice Cream Cone Cookies
Step 1: Bake the Cookies
Start with your favorite sugar cookie dough. If you have a go-to recipe, use it. If not, grab one from our classic bakery-style cookie ideas and adapt it.
Roll out the dough on a lightly floured surface and use your ice cream cone cookie cutter to cut out shapes. If you don’t have one, improvise with a circle and triangle cookie cutter.
Bake according to your recipe and let the cookies cool completely before decorating. This is crucial for the icing to set properly.
Step 2: Make Your Royal Icing Colors
Separate your royal icing into two bowls. One stays white for the skull. For the cone, mix a custom tan royal icing using these proportions:
- 2 drops lemon yellow
- 1 drop ivory
- A touch of warm brown
Play around until you get that perfect cone color.
Step 3: Outline and Flood the Cone Area
Use the tan icing to outline the cone part of your cookies. Once outlined, flood the area with more tan icing and smooth it out with a scribe tool. Let it dry for at least 30 minutes before moving on.
This part sets the stage for your ice cream shaped sugar cookies to look real and dimensional.
Step 4: Sketch and Trace the Skull Face
While the cone dries, sketch your skull face on a piece of paper. Think simple: eye sockets, a nose, maybe a spooky smile. Cut out the face and gently trace it onto the top of each cookie using a food-safe cookie marker.
This step is key for getting those skull face cookie designs just right without freehand stress.
Step 5: Outline and Flood the Skull Face
Now grab your white royal icing and outline the skull face on each cookie. Flood it just enough to fill, but don’t overdo it—especially around the mouth/teeth area. Too much icing and you’ll lose definition.
Want an extra spooky vibe? Add a little white icing drip effect down into the cone. It makes it look like the skull is melting!
Step 6: Airbrush for Depth
Once the icing dries a bit, airbrush the cone with warm brown to create shadows and cone texture. If you don’t have an airbrush, no worries—use a food-safe sponge or brush with diluted gel food coloring.
You’re basically giving your ice cream cone dessert cookies that bakery look.
Step 7: Add Skull Details
Use your food-safe marker or black icing to draw on eyes, a nose, and mouth. Feel free to get wild here. Angry skull? Sleepy skull? Vampire teeth? Go for it.
Want some shine? Dab on edible sparkle for cookies or Jewel Dust to make the eyes pop.
Tips for Decorating Ice Cream Cone Cookies Like a Pro
- Chill your dough before cutting for cleaner edges
- Don’t rush the drying time between icing layers
- Sketch face designs ahead of time to keep it consistent
- Use thicker icing for outlines and thinner icing to flood
- Store royal icing in airtight containers to keep it from crusting
Even if you mess up, guess what? These are spooky Halloween treats. Imperfection makes them even better.
Fun Variations of Ice Cream Cone Cookies
You can totally customize these based on your Halloween mood:
- Make mummy versions with white lines across the skull
- Use red icing for bloodshot eyes
- Draw spider webs or stitches for extra creep factor
- Add crushed Oreos or sprinkles to the cone part
These kinds of scary Halloween cookie ideas keep things fun and flexible.
Serving & Gifting Ideas
Pack these in clear treat bags with Halloween ribbon. They make adorable (and edible) gifts for:
- Class parties
- Office desks
- Trick-or-treaters (with clean hands, please)
- Dessert tables
Bonus: They last up to a week in an airtight container.
If you’re looking for more holiday cookie treats beyond Halloween, check out our Christmas Cookie Bars.
Related recipes
Once you’re in cookie mode, you won’t want to stop. Here are some other ideas to bake up next:
- Heart Jam Cookies: Seasonal cookie recipes with personality
- Crookie Recipe: Innovative cookie concepts for rebels in the kitchen
- Hershey’s Red Velvet Blossoms: Colorful and creative cookie designs that pop

Ice Cream Cone Cookies
- Total Time: 42 minutes
- Yield: 24 cookies 1x
- Diet: Vegetarian
Description
Spooky, sweet, and surprisingly simple, these Ice Cream Cone Cookies are the Halloween treat you didn’t know you needed. Perfect for parties, gifting, or a fun edible craft session.
Ingredients
- Sugar cookie dough (homemade or store-bought)
- Ice cream cone cookie cutter (or triangle and circle cookie cutters)
- White royal icing
- Tan royal icing
- Food coloring: lemon yellow, ivory, warm brown
- Food-safe markers
- Scribe tool or toothpick
- Airbrush machine (optional)
- AmeriMist Warm Brown airbrush color
- Paper and pencil for sketching faces
- Jewel Dust (optional)
Instructions
- Roll out sugar cookie dough and cut shapes using an ice cream cone cookie cutter.
- Bake cookies according to recipe and let them cool completely.
- Separate royal icing into white and tan (mix tan using 2 drops lemon yellow, 1 drop ivory, and a touch of warm brown).
- Outline and flood cone areas with tan icing; let dry for at least 30 minutes.
- Sketch skull faces on paper and trace onto cookies using food-safe marker.
- Outline and flood skull faces with white icing, adding icing drips for spooky effect if desired.
- Once dry, airbrush cone with warm brown to add shadows and dimension (or use food-safe brush).
- Add skull face details using food-safe marker or black icing.
- Apply Jewel Dust for added sparkle if desired.
Notes
Let each icing layer dry completely before adding the next for best results. Customize the skull faces to suit your Halloween vibe—angry, sleepy, funny, or creepy!
- Prep Time: 30 minutes
- Cook Time: 12 minutes
- Category: Dessert
- Method: Baking
- Cuisine: Halloween
Nutrition
- Serving Size: 1 cookie
- Calories: 160
- Sugar: 14g
- Sodium: 65mg
- Fat: 6g
- Saturated Fat: 3g
- Unsaturated Fat: 2g
- Trans Fat: 0g
- Carbohydrates: 24g
- Fiber: 0g
- Protein: 1g
- Cholesterol: 15mg
Final Thoughts
Ice Cream Cone Cookies are more than just a dessert—they’re a craft, an activity, and a mood. They’re spooky enough for Halloween lovers, sweet enough for the kids, and fun enough to make on repeat.
Whether you’re hosting a party, handing out treats, or just feeling festive, these cookies will bring smiles, giggles, and maybe a few delicious chills.
So go ahead, bake up a batch. You might just start a new Halloween tradition.
Want more festive-themed cookies for holidays? Explore our Valentine’s Day Cookies for sweet inspiration year-round.
Happy Halloween and happy baking!
Follow us for more drool-worthy comfort food on Pinterest and join the conversation on Facebook.