
In a world where convenience often wins, store-bought lunchables have become a go-to option for busy parents, students, and professionals. But here’s the thing: while they’re easy, they’re also loaded with preservatives and mystery ingredients. So why not skip the pre-packaged stuff and make your own homemade lunchables? Not only are they cheaper, but they’re healthier, customizable, and fun to assemble. Whether you’re prepping for the school run, work, or just need a quick lunch on-the-go, homemade lunchables are the perfect solution. Let’s dive in and learn how to make these DIY lunchables from scratch!
Table of contents
Why You’ll Love This Recipe
Homemade lunchables are a game-changer for meal prep. Here’s why they’re the perfect solution for busy days:
- Convenient and Quick: Once you prep your ingredients, assembling lunchables is a breeze. Perfect for those rushed mornings!
- Healthy: No mystery ingredients here—just fresh proteins, fruits, veggies, and snacks you can feel good about. Plus, you can load them up with healthy, protein-packed foods that store-bought options can’t compete with.
- Customizable: Hate ham but love turkey? Prefer whole-grain crackers instead of pretzels? With homemade lunchables, you get to decide exactly what goes into them.
- Budget-Friendly: Pre-packaged lunchables might seem affordable, but buying the ingredients in bulk to make your own can save you a ton in the long run. Plus, you’ll never have to worry about those random extras (like artificial dyes) you find in store-bought versions.
Whether you’re prepping for kids or creating a quick work lunch for yourself, homemade lunchables tick all the boxes for a tasty, balanced, and practical meal.
Ingredients You’ll Need
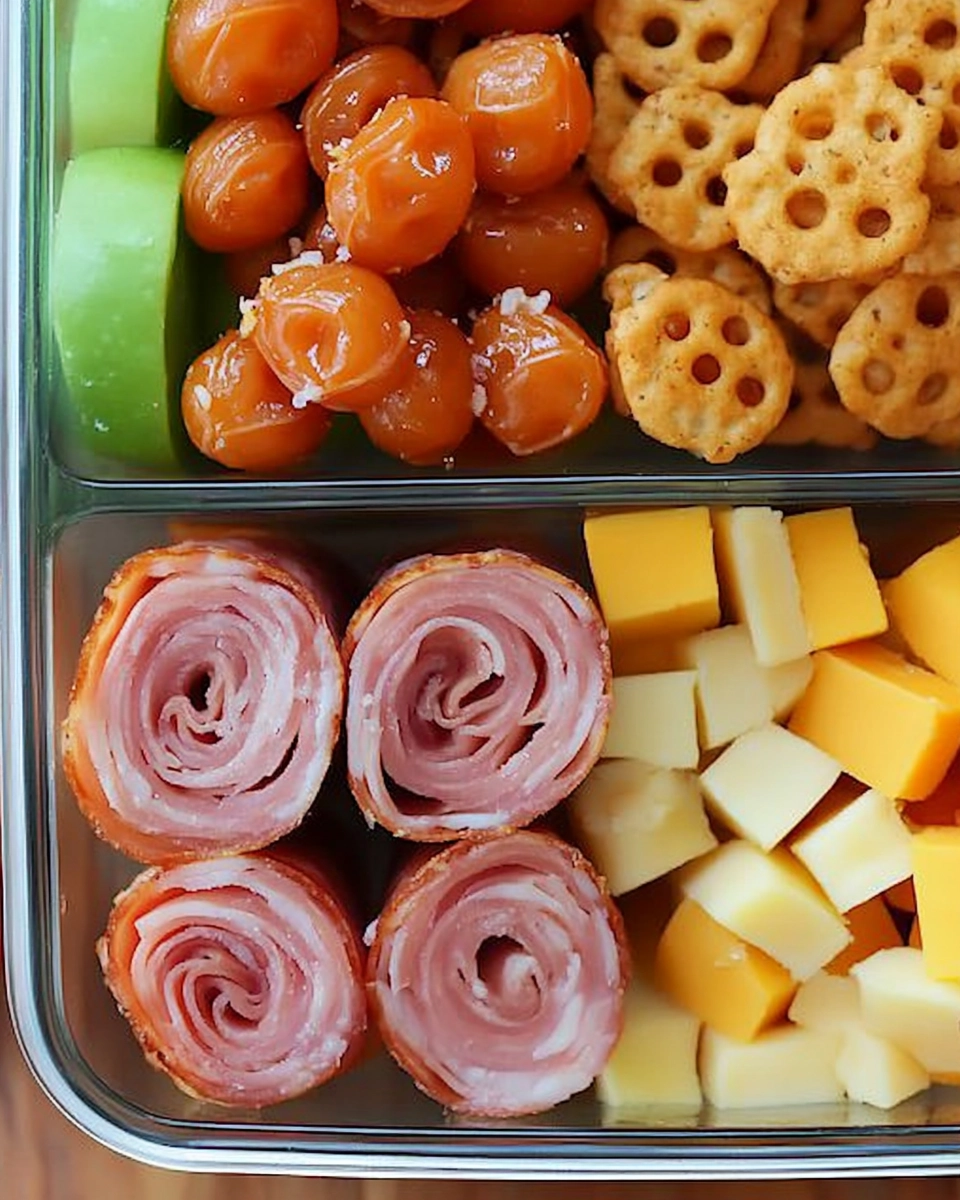
The beauty of homemade lunchables is that you can mix and match based on your preferences. Here’s a basic list of ingredients to get you started:
- Proteins:
- Deli meats like ham, turkey, or chicken.
- For a vegetarian version, try hummus, edamame, or even hard-boiled eggs.
- Cheese:
- Classic cheddar, provolone, gouda, or mozzarella work great.
- Experiment with different flavors and textures, like creamy brie or pepper jack, for something different.
- Crackers:
- Pretzel thins are a classic choice, but feel free to switch it up with whole-grain crackers, rice cakes, or cauliflower crackers for a healthier twist.
- Sides (Fruits and Veggies):
- Fresh fruit like grapes, apple slices, or berries are perfect for adding sweetness and a bit of nutrition.
- Veggies like cucumber, snap peas, or baby carrots add crunch and color.
- Extras:
- You can add things like mini pickles, olives, or a small container of dip (think hummus or ranch) to make it even more fun.
Customization Ideas
This is where the fun begins! Homemade lunchables are incredibly customizable, so let your imagination run wild:
- Protein Variations: Swap out the ham for turkey, roast beef, or chicken. For a vegetarian option, use hummus, roasted veggies, or even slices of tofu. Hard-boiled eggs are another great addition for a protein-packed punch.
- Cheese Choices: While cheddar and mozzarella are classic, feel free to get creative. Try a bit of gouda, provolone, or a spicy pepper jack. You can even try vegan cheese if you’re dairy-free.
- Cracker Options: While pretzels are traditional, whole-grain crackers, rice cakes, or even veggie chips can give your lunchables a fresh spin.
- Fun Extras: Don’t forget about the snacks! Add small containers of fruit dip, some olives, or a handful of nuts. For a sweet twist, throw in a small piece of dark chocolate or a few graham crackers.
By customizing your lunchables, you can cater to different tastes, dietary restrictions, and get the whole family involved in the prep process.
How to Make Homemade Lunchables
Assembling homemade lunchables is as easy as 1-2-3. Here’s your step-by-step guide to putting it all together:
- Prep Your Ingredients:
Start by slicing your proteins (like deli meat or hard-boiled eggs) and cheese into bite-sized pieces. Cut fruits and veggies into easy-to-eat portions. If you’re using crackers, break them into manageable sizes, too. - Assemble the Proteins and Cheese:
Place your protein and cheese into separate sections of your lunchbox or container. For example, you might have ham in one section and cheddar in another. This helps keep everything organized and easy to grab. - Add Crackers:
Include a serving of crackers in a separate compartment to prevent them from getting soggy. You can also layer them between the cheese and protein to keep them fresh. - Include Fresh Fruit and Veggies:
Add small portions of fruit and veggies to the remaining sections. Grapes, apple slices, and carrot sticks are all great choices. If you’re including dips, pack them in small containers. - Add Fun Extras:
Toss in olives, mini pickles, or nuts for a little snackable surprise. If you have room, throw in a small portion of a sweet treat, like a piece of chocolate or granola bar.
Tips for Success
Making homemade lunchables is pretty simple, but here are some tips to make sure they stay fresh and fun:
- Storage:
Use airtight containers to store the assembled lunchables. Separate the crackers to prevent them from getting soggy. If packing for school or work, an insulated lunchbox with an ice pack will keep everything cool. - Keep It Fresh:
Pat down fruits and veggies with a paper towel before packing them to remove excess moisture. This helps prevent wilting or sogginess. - Get the Kids Involved:
One of the best parts of homemade lunchables is that they’re fun to assemble! Let the kids pick their favorite items and help with the prep. It makes lunch more enjoyable and gets them excited to eat their creations.
Meal Prep Ideas
If you want to make lunchables a regular part of your routine, meal prepping can save you time during busy mornings. Here’s how to make lunchables prep-friendly:
- Pre-Assemble the Ingredients:
You can chop and prepare everything the night before. Store your proteins, fruits, veggies, and cheese in separate containers in the fridge. When morning comes, all you need to do is grab and go! - Batch Prep:
Prepare enough ingredients for a week’s worth of lunchables in one go. Store your prepped veggies, fruits, and proteins in the fridge for quick assembly throughout the week. This cuts down on the morning rush. - Lunchable Bins:
Keep a “lunchable bin” in the fridge, filled with proteins, crackers, fruits, and veggies. That way, assembling a lunchable becomes as easy as pulling out a few ingredients and packing them.
FAQs
Homemade lunchables can be stored in airtight containers in the fridge for up to two days. For best results, store crackers separately to prevent them from getting soggy.
While it’s not ideal to freeze assembled lunchables, you can prep the ingredients ahead of time and freeze certain items like deli meat or cheese. Assemble the lunchables once they’re thawed.
Pack lunchables in a divided container and add an ice pack to keep everything cool. Make sure to store crackers and perishable items separately for freshness.
Absolutely! You can use hummus, cheese, veggies, fruits, and even nuts for a fully vegetarian lunchable.
Let the kids help assemble their own lunchables, or use cookie cutters to make fun shapes out of cheese or fruit. The more interactive, the more exciting it will be for them!
Storage and Make-Ahead Instructions
To keep everything fresh and ready to go, here’s how to store your lunchables:
- Refrigeration: Store your lunchables in airtight containers to keep everything fresh.
- Storage Time: They’ll last for up to two days in the fridge. However, always keep crackers in a separate compartment to avoid sogginess.
- Make-Ahead: You can prep ingredients for several days in advance, but wait until the morning of to assemble the lunchables.
Related recipes
Looking for more options? Here are a few ideas to shake things up:
- Low-Carb Option: Swap crackers for lettuce wraps or sliced cucumber to keep it light.
- Picky Eater: Keep it simple with familiar ingredients like cheese, crackers, and fruit. Let the kids pick their own combos to make it more appealing.
Homemade Lunchables: Simple, Healthy
- Total Time: 10 minutes
- Yield: 4 servings 1x
Description
Homemade lunchables are healthier, customizable, and fun to assemble. Skip the store-bought versions, and make your own with fresh proteins, fruits, veggies, and snacks. Perfect for work, school, or a quick lunch on-the-go.
Ingredients
- Deli meats like ham, turkey, or chicken.
- Hummus, edamame, or hard-boiled eggs for a vegetarian version.
- Cheeses like cheddar, provolone, gouda, or mozzarella.
- Whole-grain crackers, pretzel thins, or veggie chips.
- Fresh fruits like grapes, apple slices, or berries.
- Veggies like cucumber, snap peas, or baby carrots.
- Extras like mini pickles, olives, or a small container of dip (hummus or ranch).
Instructions
- Slice proteins (deli meat or hard-boiled eggs) and cheese into bite-sized pieces. Cut fruits and veggies into easy-to-eat portions. Break crackers into manageable sizes.
- Place protein and cheese into separate sections of your container, then add crackers to prevent sogginess.
- Fill in the remaining sections with fruits, veggies, and optional extras like olives, mini pickles, or a small treat like chocolate.
Notes
Store crackers separately to prevent sogginess. Refrigerate in airtight containers and consume within two days.
- Prep Time: 10 minutes
- Cook Time: 0 minutes
- Category: Lunch
- Method: No Cook
- Cuisine: American
Nutrition
- Serving Size: 1 serving
- Calories: 350
- Sugar: 12g
- Sodium: 800mg
- Fat: 22g
- Saturated Fat: 6g
- Unsaturated Fat: 14g
- Trans Fat: 0g
- Carbohydrates: 20g
- Fiber: 5g
- Protein: 20g
- Cholesterol: 55mg

Final thoughts
Homemade lunchables are an easy, fun, and healthy way to keep your lunches exciting. From assembling proteins and cheese to adding fresh fruits and fun extras, the possibilities are endless. These lunchables are not only perfect for meal prepping but also for satisfying your cravings without relying on store-bought, pre-packaged options. Ready to get started? Go ahead, mix and match, and let the whole family have fun creating their own personalized lunchables!
Follow us for more drool-worthy comfort food on Pinterest and join the conversation on Facebook.