
If you’ve ever wanted a dessert that looks elegant but takes almost no effort, yogurt panna cotta is about to become your new favorite thing. It’s smooth, creamy, lightly sweet, and has that soft wobble that makes panna cotta feel extra special. But here’s the best part: this version is lighter, fresher, and way more flexible than the classic one.
Traditional panna cotta leans heavily on cream. This one uses yogurt, milk, vanilla, and gelatin to create a chilled dessert that feels rich without being too much. It’s perfect for warm weather, brunch tables, meal prep jars, and those nights when you want something sweet but not too heavy.
And yes, if you searched for yugort panna cotta, yoghurt panna cotta, or even yogurt panacotta, you’re still exactly where you need to be.
This easy yogurt panna cotta recipe works beautifully with fresh fruit, honey, citrus, and crunchy toppings. It can double as a healthy panna cotta, a breakfast panna cotta, or a polished little dessert for guests. It’s also a fantastic make ahead option, which means less stress for you and more “wow, you made this?” from everyone else.
Let me show you exactly how to make it right.
Yogurt Panna Cotta Is the Perfect Light Dessert
Yogurt panna cotta is one of those recipes that quietly does everything well. It’s chilled, creamy, refreshing, and just sweet enough to feel satisfying without knocking you out after one bite.
Unlike heavier custards or cream based desserts, panna cotta with yogurt has a fresh tang that balances the sweetness. That makes it ideal for fruit toppings and brunch style serving. It also means you can enjoy it after dinner without feeling like you need to lie down immediately.
This light panna cotta recipe is especially good when you want something that feels homemade and impressive, but doesn’t ask for baking, complicated steps, or fancy tools. You’re basically stirring, chilling, and topping. That’s it.
It also works beautifully for meal prep. Pour the mixture into little jars, let it set overnight, and suddenly you have a make ahead yogurt dessert ready to go. If you love easy chilled recipes, you might also enjoy this creamy vanilla chia pudding, which has the same grab and go energy.
Yogurt Panna Cotta Ingredients That Make It Creamy and Smooth
Yogurt panna cotta only needs a few ingredients, but each one plays an important role in getting that silky texture just right.
Here’s what you’ll need:
For the panna cotta
1 ½ cups milk
2 to 3 tablespoons honey or maple syrup
2 teaspoons gelatin powder
1 cup plain yogurt
1 teaspoon vanilla paste or vanilla extract
For the fruit topping
2 medium kiwis
6 large strawberries
1 tablespoon lemon juice
1 teaspoon lemon zest
2 tablespoons fresh mint, finely sliced
Optional toppings
granola
toasted muesli
crushed pistachios
almonds
pumpkin seeds
coconut flakes
The milk gives the dessert body without making it too rich. The yogurt adds tang and creaminess. The gelatin is what creates that classic set dessert texture. Honey or maple syrup adds soft sweetness, and vanilla rounds everything out.
Best yogurt for panna cotta
You can use plain yogurt or Greek yogurt.
Plain yogurt gives you a lighter, softer finish. Greek yogurt creates a thicker, more luxurious Greek yogurt panna cotta with a slightly tangier bite.
Both work. It really comes down to whether you want your dessert to feel airy or a little richer.
Yogurt Panna Cotta Method for the Best Wobble
Yogurt panna cotta is easy, but the texture depends on doing a few simple things in the right order. This is where the magic happens.
Step 1: Bloom the gelatin
Pour the milk into a saucepan and sprinkle the gelatin evenly over the top. Let it sit for about 3 minutes.
This softens the gelatin so it dissolves smoothly. Don’t skip it unless you enjoy mystery lumps.
Step 2: Warm the milk mixture
Place the saucepan over medium low heat. Add the honey or maple syrup and stir gently until the milk is warm and steamy.
You want the gelatin fully dissolved, but you do not want the milk boiling. A boil can mess with the texture and make your homemade panna cotta less silky.
Once everything is dissolved, remove it from the heat and let it cool until it’s close to room temperature.
Step 3: Mix the yogurt and vanilla
In a separate bowl, stir together the yogurt and vanilla until smooth.
This is your creamy base.
Step 4: Combine slowly
Drizzle the cooled milk mixture into the yogurt little by little, stirring constantly.
If you pour hot milk directly into cold yogurt, the yogurt can split. Not dramatic, but definitely annoying.
Step 5: Pour and chill
Pour the mixture into jars, glasses, ramekins, or dessert cups. Refrigerate for at least 4 hours.
Overnight is even better if you want a fully set yogurt gelatin dessert with the ideal wobble.
Yogurt Panna Cotta Texture Tips So It Turns Out Silky Every Time
Yogurt panna cotta should never be stiff, rubbery, or weirdly bouncy. A proper panna cotta should feel smooth, creamy, and just soft enough to tremble when you move the glass.
That gentle wobble is exactly what you’re after.
How to know it’s right
Your creamy yogurt panna cotta should:
feel cool and silky on the spoon
hold its shape without being firm like jelly
look smooth and glossy
taste creamy with a slight tang
Common texture mistakes
The biggest issue people run into is overheating the milk or adding it to the yogurt while it’s still too hot.
If your mixture looks grainy or split, don’t panic. Blend it briefly until smooth and pour it into the jars anyway. Most of the time, it’s totally fixable.
Another mistake is using too much gelatin. It’s tempting to think “more gelatin means better set,” but that’s how you end up with dessert that feels like a rubber eraser.
Stick to the measured amount and trust the chill time.
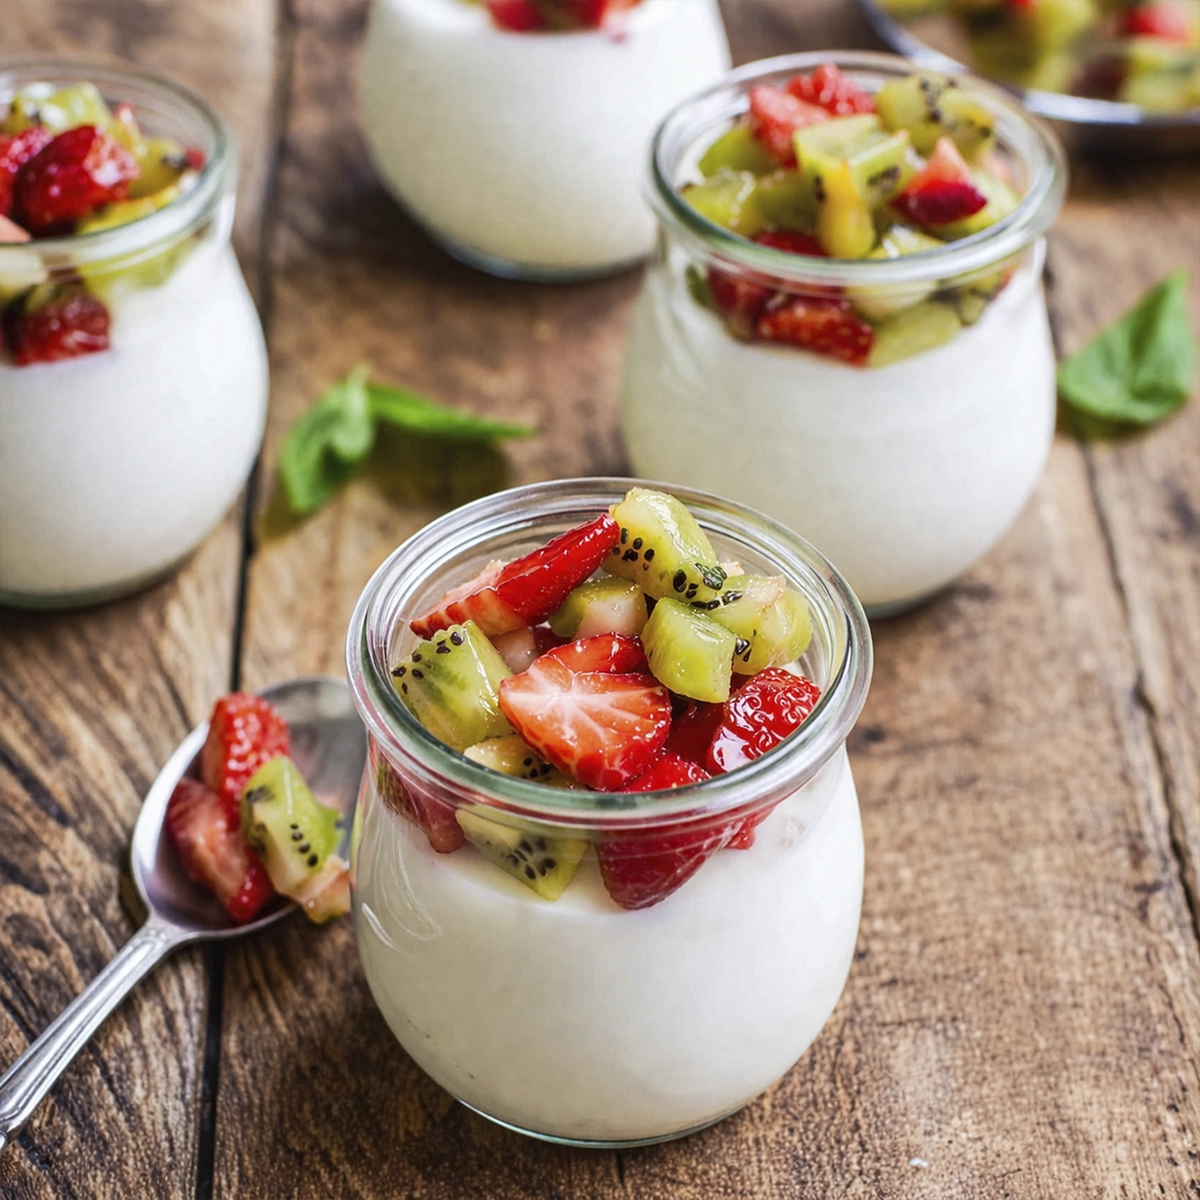
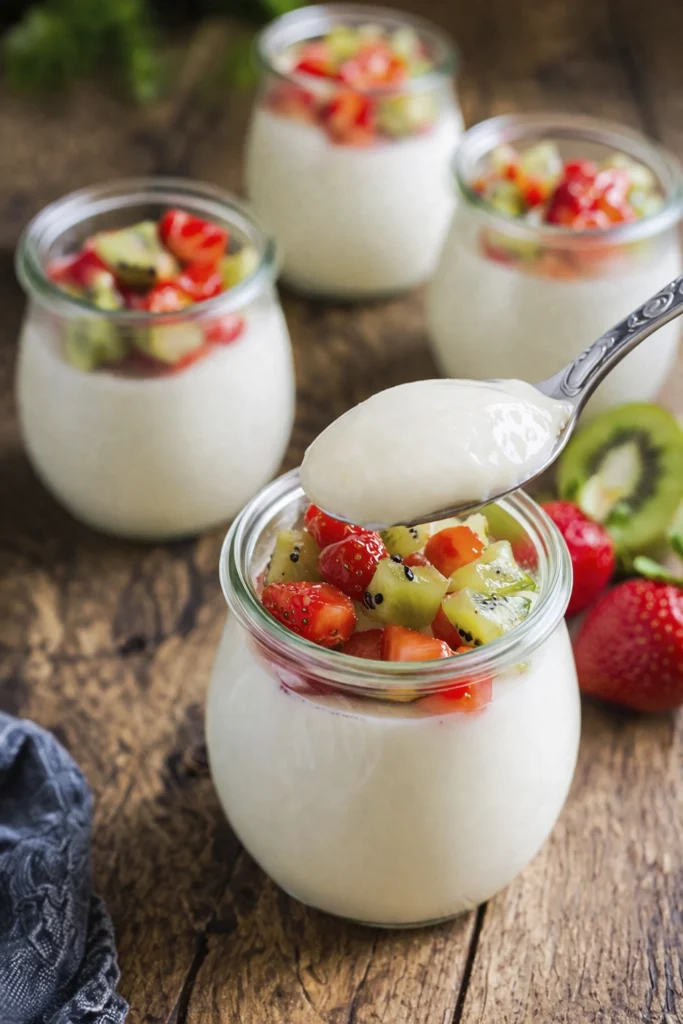
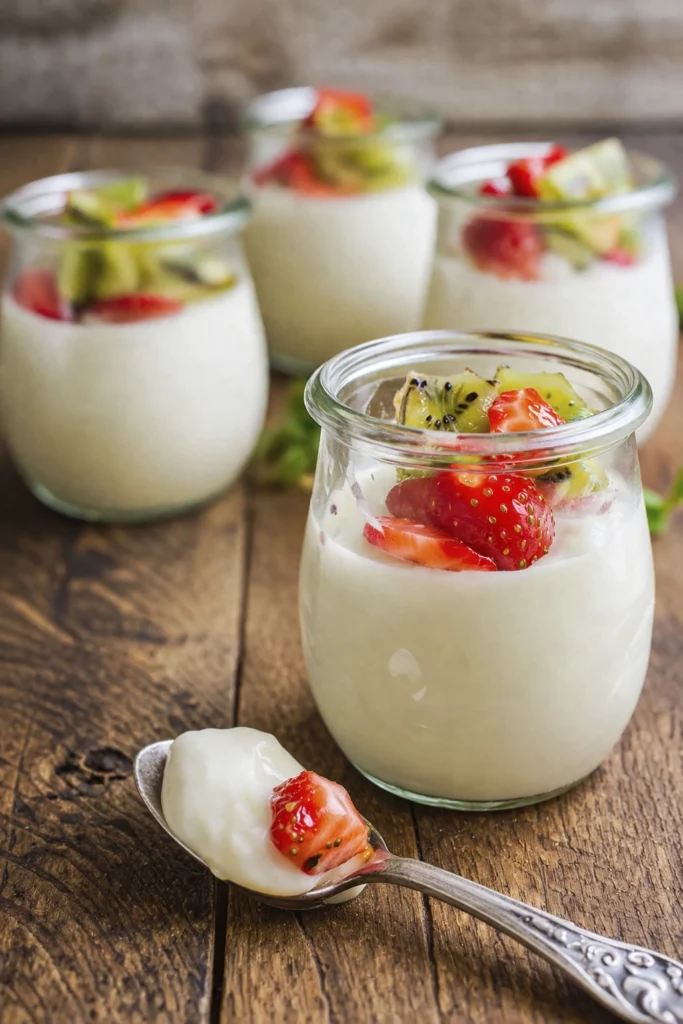
Yogurt Panna Cotta Toppings That Make It Taste Fresh and Fancy
Yogurt panna cotta is lovely on its own, but the toppings are what take it from “nice” to “where has this been all my life?”
Fresh fruit is the easiest and best match for the creamy base.
Fresh fruit topping idea
Dice the kiwi and strawberries into small pieces. Toss them with lemon juice, lemon zest, and fresh mint.
That combo gives you sweetness, brightness, and just enough zing to wake up the whole dessert.
Spoon it over the top right before serving.
More topping ideas for yogurt panna cotta
berries and honey
mango and lime zest
peaches and basil
blueberries and lemon
orange segments and mint
raspberries and pistachios
If you’re in the mood for another chilled fruity dessert, this strawberry icebox cake is a really good one to bookmark too.
Crunchy topping ideas
If you like contrast, add:
granola
toasted muesli
chopped nuts
seeds
toasted coconut
That creamy plus juicy plus crunchy combination is ridiculously good.
Yogurt Panna Cotta Variations You Can Make All Year
Yogurt panna cotta is one of those base recipes you can keep reinventing depending on the season, your mood, or what fruit is on sale.
Lemon vanilla yogurt panna cotta
Add extra lemon zest to the base for a bright citrusy version that tastes super fresh.
Honey Greek yogurt panna cotta
Use Greek yogurt and honey for a thicker, richer version with a cozy, floral sweetness.
Berry compote yogurt panna cotta
Top your vanilla yogurt panna cotta with a spoonful of berry compote instead of fresh fruit if you want something more dessert like.
Tropical yogurt panna cotta
Top with mango, pineapple, and toasted coconut for a summery twist.
Floral yogurt panna cotta inspiration
If you enjoy chilled spoon desserts with delicate flavors, take inspiration from jasmine tea jelly or blue tea gelatin. Both bring that same cool, refreshing dessert energy.
This recipe is flexible enough to feel like a healthy sweet treat one day and a polished dinner dessert the next.
Yogurt Panna Cotta Storage Tips for Meal Prep and Make Ahead Desserts
Yogurt panna cotta is a dream if you like making dessert ahead of time. In fact, it’s actually better when made in advance because the chilling time gives it that perfect set.
How to store yogurt panna cotta
Keep it covered in the refrigerator for up to 2 to 3 days.
If you’re serving it for guests, you can make the base the night before and top it just before serving. If you’re using it as a breakfast panna cotta, jars with lids work especially well.
Best way to prep ahead
Make the panna cotta base
Pour into jars
Chill overnight
Add fruit in the morning or just before serving
This makes it ideal for brunch, meal prep, or easy entertaining.
If you love no bake citrus desserts too, Carlota de Limón is another one worth trying.
Can you freeze yogurt panna cotta?
Technically yes, but the texture can get watery or grainy after thawing. Since this dessert is all about that smooth creamy finish, the refrigerator is the better move.
Yogurt Panna Cotta FAQ for First Time Success
Yogurt panna cotta is simple, but there are a few common questions that come up every time.
Yes, absolutely. That’s one of the best things about this recipe. It’s a yogurt panna cotta without heavy cream, but still tastes creamy and rich.
Yes. It creates a thicker and tangier Greek yogurt panna cotta.
At least 4 hours in the fridge. Overnight is even better.
Yes, but agar sets differently and can be firmer. Follow the package instructions carefully if you’re swapping it in.
Usually because the milk mixture was too hot when mixed into the yogurt. Let it cool first, then combine slowly.

Yogurt Panna Cotta: The Creamy No Bake Dessert You’ll Want to Make Again
Description
Yogurt panna cotta is smooth, creamy, lightly sweet, and has that soft wobble that makes it feel extra special. This lighter version uses yogurt, milk, vanilla, and gelatin for a fresh, elegant no bake dessert that works beautifully for warm weather, brunch tables, meal prep jars, or an easy make ahead treat.
Ingredients
- 1 1/2 cups milk
- 2 to 3 tablespoons honey or maple syrup
- 2 teaspoons gelatin powder
- 1 cup plain yogurt or Greek yogurt
- 1 teaspoon vanilla paste or vanilla extract
- 2 medium kiwis
- 6 large strawberries
- 1 tablespoon lemon juice
- 1 teaspoon lemon zest
- 2 tablespoons fresh mint, finely sliced
- Granola (optional)
- Toasted muesli (optional)
- Crushed pistachios (optional)
- Almonds (optional)
- Pumpkin seeds (optional)
- Coconut flakes (optional)
Instructions
- Pour the milk into a saucepan and sprinkle the gelatin evenly over the top. Let it sit for 3 minutes to bloom.
- Place the saucepan over medium low heat and add the honey or maple syrup.
- Stir gently until the milk is warm and steamy and the gelatin is fully dissolved. Do not boil.
- Remove from the heat and let the milk mixture cool until close to room temperature.
- In a separate bowl, stir together the yogurt and vanilla until smooth.
- Slowly drizzle the cooled milk mixture into the yogurt, stirring constantly until fully combined.
- Pour the mixture into jars, glasses, ramekins, or dessert cups.
- Refrigerate for at least 4 hours or overnight until set.
- Dice the kiwi and strawberries into small pieces.
- Toss the fruit with lemon juice, lemon zest, and fresh mint.
- Spoon the fruit topping over the panna cotta just before serving.
- Finish with optional crunchy toppings like granola, nuts, seeds, or coconut flakes if desired.
Notes
For the silkiest texture, do not overheat the milk and never pour it hot directly into the yogurt. Plain yogurt gives a lighter finish, while Greek yogurt creates a thicker, tangier panna cotta. Best served chilled and topped just before serving.
Yogurt Panna Cotta Is the Easy Elegant Dessert Worth Keeping
Yogurt panna cotta is proof that you don’t need a long ingredient list or a stressful recipe to make something that feels special.
It’s creamy, fresh, light, and flexible enough to work as a dessert, brunch treat, or make ahead breakfast. It’s also one of those recipes that looks impressive even though it’s secretly very low effort, which is honestly the sweet spot.
Once you make this easy yogurt panna cotta, you’ll start thinking of all kinds of ways to switch up the fruit, flavors, and toppings. And that’s exactly why it’s worth keeping in your regular recipe rotation.
So go ahead, grab the yogurt, bloom the gelatin, and make the kind of dessert that quietly steals the whole show.
For more delicious recipe ideas, check out our Pinterest page at virlerecipes. Happy cooking!